


Location Information:
Taken on Chervonoarmiyska St, Kiev, September 18, 2011
Original Photo Information:
ISO 400, 10mm, f/8.0, 1/160 sec
Processing Tools:
HDRSoft Photomatix
Adobe Lightroom
Adobe Photoshop
onOne Perfect Effects
Russell Brown’s Detailing Actions
Processing information:
HDR created from one original photo (-1, 0, +1)
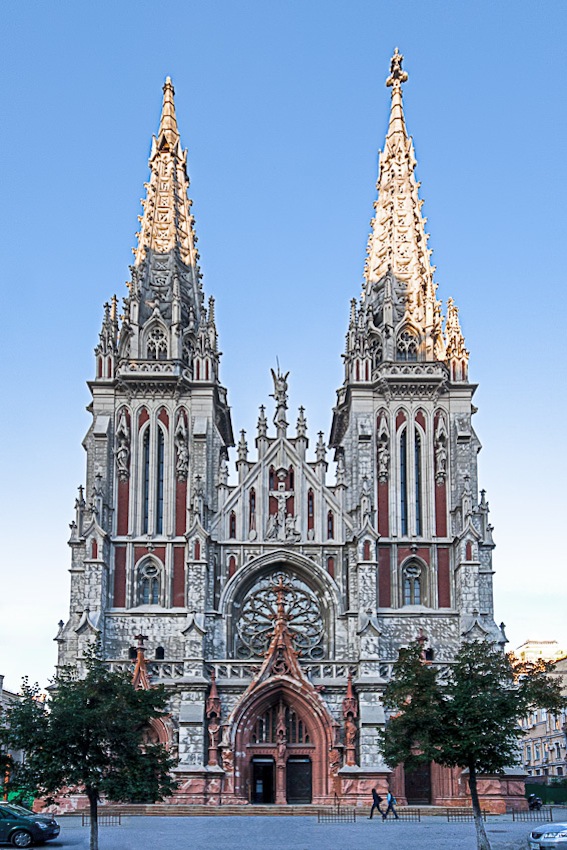
The church is tilting backwards; made it more upright. The buildings on the sides disappeared during uprighting the church.
Removed a car from the photo. Reconstructed the church facade.
Removed utility wires.
Other minor touch-up details.
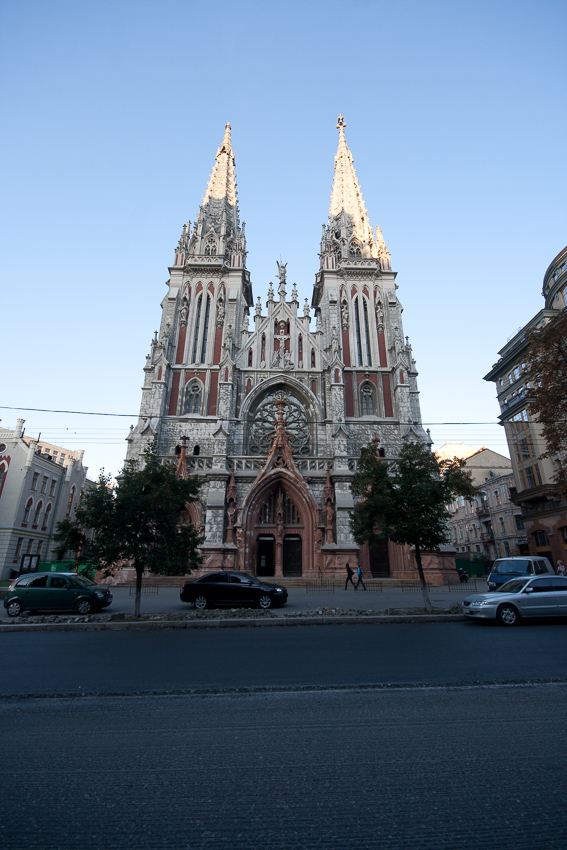
The Straight Out of Camera Photo:
The “Break the Rules” HDR processed photo:

The Final Result:
Continue for full details.
NOTE: This walkthrough is to give you a general idea about how to proceed when processing your photos. The details I give here are specific to this photo. Whenever you see exact numbers and settings, keep in mind that these may or may not work on your photo!
The Details:
City shots by their nature can be extremely challenging. Sometimes you can’t step back far enough to get the shot you want. And the further you step back, the more likely other items that you don’t want in your photo will pop into your photo, just for the heck of it. Both applied in this shot.
This shot was taken late on a Sunday afternoon, which helped ensure that there would be minimal traffic on this street, one of the busiest in central Kiev. But there’s always parked vehicles. Always. Any other time there would have been more. But the time of day also ensured that there would be bright sunlight on the steeples while the rest of the church would be in shadow. Certainly not the easiest lighting conditions to work with, to be sure. But that’s what I had to work with that day. (In hindsight, this is a situation where I would have broken the rules of my “Break the Rules” HDR tutorial and used three original photos instead of only one. But I only had one so that’s what I worked with). So, where to start with this one?
Using Lightroom, I created two virtual copies of the original photo. I left the original photo at it’s original exposure and set the two others to -1EV and +1EV. I exported the three photos out of Lightroom and imported them in to Photomatix. For more on this part of the process, see my “Break the Rules” HDR tutorial. (LINK) Once I was finished in Photomatix, I imported the HDR photo and the three photos exported earlier back into Lightroom. Now it’s time for some Photoshop magic.
First, I select all four photos in Lightroom, did a right click, and selected “Edit In” > “Open as Layers in Photoshop.” Once all photos were ready in Photoshop, I moved the HDR version to the top of the stack, then one by one compared the HDR version to the 0EV version, the -1EV version, and the +1EV version to see if there were any elements in the EV versions that looked better than what appeared in the HDR version. In this case, there were none, so one by one I merged each image until the photo was flattened.
Straightening the Building.
Now it’s time for Photoshop’s Lens Correction tool. Go to Filter > Lens Correction, then choose Custom. To straighten up the building, I used the Vertical Perspective slider. But oh-oh, at about -55, you start to lose the top of the steeples and the building isn’t nearly as straight as I want it to be yet. Must cancel out of this. So, what to do now?
It’s time for the Canvas Size tool. Go to Image > Canvas Size. I extended the size of the working canvas by increasing the number in the height box, in this case a bit over 1000 pixels, without increasing the number in the width box. (Make sure Relative is NOT checked). Then click in the middle box of the bottom row in the area that says “Anchor.” This indicates that your canvas space will be increased on the top and on both sides. But since you did not change the value in the width field, in reality the canvas will only extend upward, which is what you want. Click OK.
Now go back to Lens Correction. Filter > Lens Correction, and select Custom. Set the Vertical Correction slider to -100. Now, that’s a whole lot better. But I still wanted to straighten out this building even more. This can be done. First, click OK to apply this change. Now go back into Lens Correction and select Custom. Adjust the Vertical Correction again by setting it to -50. But because of all this correction, it always helps to go to the Correct Distortion slider and move that around a bit to see if something looks better. I found that setting this slider to +20 gave a much more pleasing outcome. But I still wasn’t done here yet.
Next, I zoomed into the photo to see the details closer. When I did this, it appeared that the right side of the building was a bit further away than the left side. No problem. Using the Horizontal Perspective slider, I corrected that by setting it to -5. Even then, it appeared the whole photo had a very slight tilt to it. I corrected that by setting the Angle to -.2. (Not -2, -.2, minus point 2). Click OK.
Now the architectural integrity of this structure has been corrected. Well, almost. Look at the base of the church, where it’s in contact with the ground. The center of the base is higher than the two sides. This can be corrected by going to Edit > Transform > Warp. Bring the lower left and the lower right corner of the Warp overlay box up a bit to straighten the base out, making sure you don’t leave any blank pixels on either the left or the right. Click OK.
Using a few guides, it now appears that it’s still not quite there. Be prepared to use Lens Correction or Transform > Warp numerous times in order the get the building’s perspective corrected just so!
Crop.
Remember a few steps ago where I used the Canvas Size too to expand the canvas? At this point it’s clear that we have a lot of space at the top and at the bottom of the photo that is no longer serving any useful purpose. Time to get rid of that. First, go to View > Clear Guides to get rid of the extra pixels. Then click the Crop tool. I went for a 2:3 ratio crop and adjusted to include and exclude certain items from view. I clicked OK and finished the crop.
Cloning.
Now comes the complicated part. While this photo looks fine the way it is, I choose to get rid of any number of items that were still visible. Things that must go were the bricks at the very bottom of the photo, the car in the middle, and the utility wires. And not just the most noticeable part of the wires, namely those that extend beyond the limits of the building. No, I wanted to get rid of them totally, even in places where they seem to blend into the texture and structure of the building.
Since your photo will be different, let me give you some general strategies on how to proceed.
To get rid of a large item, like a car. Use the Rectangular Marquee tool, select an area, and copy and paste. Move that pasted area to start covering up the car. Repeat as necessary. Later on you can blend the seams, using the Spot Healing Brush Tool with Content Aware selected, where the copied areas come together to blend the pasted areas together. Some additional cloning with the Stamp Clone Tool might also be needed.
To get rid of utility wires. Always start with the Spot Healing Brush Tool with Content Aware selected. This doesn’t always work, but where it does work, it often works amazingly well. If it only worked 80-90%, don’t fret. You can always patch up the problem areas later with the Stamp Clone Tool.
If I just made that sound so easy, you’ll likely find that it’s not. You can do all the cloning above quickly in ten minutes and it will likely look good enough… as long as you view it at 33% or smaller. If you ever hope to view it at 100%, you’ll need to spend a lot of time mastering the the Spot Healing Brush Tool with Content Aware and the Clone Stamp Tool. One hundred hours with these two tools will maybe get you to an intermediate cloner level. Don’t fret. Nobody ever said this would be easy.
Final Touches:
I then went to onOne Perfect Effects. I applied the Radiance preset at 30%, the Darken HIghlights preset (to tone down the sunlight on the steeples) at 100%, the Darken Midtones preset at 50% (which not only gave the church the effects that I liked, but also blued out the sky, meaning it became very blue. But we’ll fix that later), and the Auto Fix preset at 100%. Clicked OK.
Back in Photoshop, I fired up Russell Brown’s Detailing Actions and selected and ran the Smart Object High Pass Detail option, to sharpen and bring out added detail. I saved to Lightroom and then applied some Blue Luminance Shift (to tone down the blues) and some Red Saturation Shift (to bring out the reds), popped the exposure, vibrance, and clarity a bit.
Now for a direct comparison of the Before and After. Click anywhere within the photo to make the slider move to the left or the right. SUCCESS!
And the alternate "BETTER" version of before and after:
No comments:
Post a Comment